Showing posts with label lesson. Show all posts

Wednesday, November 28, 2007

Turning your text UP-SIDE-DOWN

You will need to flip your text to appear as though it is up-side-down for pages 1, 2, 3 and the inside cover. You will notice if you select the text and manually rotate it using the double sided arrow that the selection box rotates, but the text does not.
Follow these steps to rotate:
  • Select all of the text with the Selection tool (the dark arrow)
  • Use the "Effect" drop down in the Menu bar at the top
  • Go to Effect> Distort and Transform> Transform...
  • The "Transform Effect" dialogue box will appear
  • At the bottom is a section called "Rotate"
  • In "Angle" box type 180 (for a 180 degree rotate)


Thursday, October 18, 2007

Embedding video to your blog

You should have already opened a Vimeo or Youtube account and uploaded your video.
  1. Now, start a new post on your blogger.
  2. Toggle from the "Compose" tab to the "Edit HTML" tab in the upper right hand corner of the blog post window (see image)
  3. Open a new window or tab with your Vimeo or YouTube video on it.
  4. If using YouTube, there will be a small dialogue box to the left of the video that says "Embed." Highlight the code in the embed window {apple C} to copy it.
  5. Toggle to your blogger post. Click inside the body of the "Edit HTML" window. Then {apple V} to paste the code.
  6. Publish the post.
  7. If using Vimeo. Open your video on a page. Hover your cursor over the video. Three buttons will pop up in the upper right corner of the video. One of them says "Embed." Click on it.
  8. A pop-up window will open. {apple C} to copy the highlighted code.
  9. Toggle to your blogger post. Click inside the body of the "Edit HTML" window. Then {apple V} to paste the code.
  10. Publish the post.
  11. Test to make sure it worked.

Wednesday, October 17, 2007

How to Animate your Still Images

  • Open Photoshop - Do not open your images yet
  • Set your workspace to the default: Window > Workspace > Default Workspace
  • Open the Animation Palette: Window > Animation
  • You should have a series of images prepared. Your images should be sized the same and be the same orientation (horizontal or vertical). They should also all live in a folder together.
  • Now load your images into photoshop: File > Scripts > Load Files into Stack...
  • A dialogue box will open: highlight your files. To highlight them all at once: click on the first, hold down shift, click on the last. Click ok.
  • Photoshop will automatically load the images into a single file as a series of layers. All layers will be "on," which means you will see the "eyes" turned on in the layers palette.
  • Once the files are loaded as layer, go to your animation palette and use the flyout menu. The icon for the flyout menu is very small. It looks like 3 little horizontal lines, like treads, in the upper right corner of the animation palette. When you click on it, the flyout will pop up... er, fly out.
  • Click on "Make Frames from Layers."
  • Be sure at this point to have the animation palette set to "frame" view. The animation palette has 2 views: Frames and Timeline. We want to work in frame view. To toggle between them, click the icon in the lower right corner of the animation palette. The frame view should look like a series of blocks lined in a horizontal row.
  • You will see that each layer loads as a frame in the animation palette.
  • As a default, frame "1" will be loaded at 10 seconds, and all of the other frames will load at 0 seconds. At the bottom of each frame you can adjust the amount of time that each frame is shown by clicking on the small drop-down and choosing a duration.
  • You will notice as you click on different frames that the layers palette has adjusted which layer is "on" (which eyes are on or off.) Since the layers palette is hierarchical from top to bottom, whatever is the top layer that is turned "on" will be the designated image for the frame.

Suggestions:
Until you get a handle on how the frames effect one another, work on editing your images and adding and subtracting layers first. Arrange and select the duration for your frames as a last step.

Exporting to a .mov file

This process will occur in a series of dialogue boxes. Just follow along.

  • Have your completed animation open in Photoshop
  • Got to File > Export > Render Video
  • The "Render Video" dialog box will appear

  • Give your file a name (do not disturb the three letter file extension)
  • Select the location of your choice to save it into
  • Select Quicktime Export
  • Click the "Settings" button to the right of "Quicktime export"
  • "Movie Settings" dialogue box appears
  • Click "Settings" at the top
  • "Standard Movie Compression Settings" dialogue box appears (I know, that is a lot of boxes)
  • Compression type = Mpeg 4
  • Set the frame rate to "30"
  • Set the key frame to "auto"
  • Set the Compressor to "medium"
  • Data rate to "auto"
  • Click OK
  • Back to "Movie Settings" dialogue box
  • Size 500x300 (youtube = 320x240)
  • Uncheck sound
  • Uncheck prepare for internet streaming
  • Back to "Render Video" dialog box
  • Check all frames
  • Render options set to 30
  • Click ok
After the export is completed, go to a Finder window and open the .mov file that you just created. Double click it to open it in quicktime. Make sure it plays properly.
Last, go back to finder and click once on the file. Look to see that the file is an appropriate size (YouTube and Vimeo will tell you what size they can handle)

Wednesday, September 19, 2007

One A Day - Manipulation 02

Manipulate your original scan using filters, layers and opacity to create an image that will serve as a background for the manipulations to come. Think about dulling the contrast by adding a "glazing" layer.
Here is an example:

Tuesday, September 18, 2007

Resampling & Save for Web

Re-sampling, or re-formatting, is the process of modifying the pixel count of an image. The reason we do this, is again, to make our file size as small as possible. You have started your "One a Day" project with a scan at 300 dpi, but a web image only needs to be 72 dpi. So we will re-sample the image as a means to be efficient and save room.
1.) Open your image in Photoshop.
2.) Go to Image>Image Size...
3.) First drop your resolution from 300 pixels/inch to 72 pixels/inch
4.) Next modify the "Pixel Dimension" width to meet your needs (between 300 - 500 pixels will be sufficient to fill your blog column.)
5.) Click OK
6.) Move along to the "Save for Web" tutorial below.


To prepare your image to post on Blogger is to optimize it using the "Save for Web" option. Optimizing is a way to lower your file size while not degrading your image quality. This will save more space on your blogger account.

1.) Open you image in photoshop.
2.) Go to "File" - "Save for Web"
3.) The "Save for Web" dialog box will open. Click on the tab "2-up" in the upper left hand corner [FIGURE A]. This will give you the original image on the left and the optimized version(s) on the right.
4.) On the right hand size you will see some options. Use the drop-down menu on the left, to make sure you are saving your image as a "JPEG" [FIGURE B].
5.) Use the next drop-down menu to choose the level of image quality [FIGURE C]. Try each option and watch how your image changes in the right hand window. Choose the image quality that is the lowest file size, but still acceptable to your for image quality. Remember, the goal here is to obtain the lowest file size possible to save space. (Aim for around 12k if you can)
6.) Looks good? SAVE!! and ReName-But remember not to use spaces in you file name. I also like to use the word "web" in it, so i know it is my web image. Save it in your images folder.
7.) Post it on your weblog! (Remember when posting on the blog, choose large image (since you have already formatted it, making it smaller is unnecessary.)

Tuesday, September 4, 2007

Scanning Tutorial

1. Open the Epson Scanner Application
- in the library, just click on the scanner icon in the dock (TIP: if you are scanning in the Library and need to use drop/send to transfer your files, know that only the left hand computer, closest to the corner, has internet access)
- in the computer lab, open a finder window and go to "Applications", then EpsonScanner.app

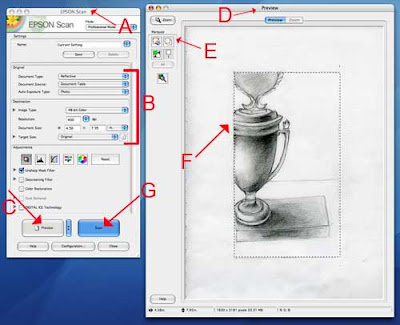
2. The Epson Scan window will open [FIGURE A] (the preview window may open to, just leave it).

3. Check your Settings [FIGURE B]: use the drop down menus to make your selections as follows:
Document type: Reflective
Document Source: Document table
Auto Exposure Type: Photo
Image Type: 48-bit or 24-bit color
Resolution: Select your resolution anywhere between 150 - 400 DPI (dots per inch) The more dots per inch, the larger the file size. If you need to use email to transfer the file, you will want to choose a smaller file size. If you have an iPod or flash drive, or plan to burn a disk - shoot for 300 dpi

4. The remaining adjustments can be left untouched.

5. Place your document on the scanner bed and close the lid.

6. Click the "Preview" button [FIGURE C]

7. The "Preview" window will open [FIGURE D] and the scanner will take a quick image of the document and display it here. If you need to reposition the document, do so now and hit "Preview" again.

8. Use the marquee tool [FIGURE E] to draw a selection [FIGURE F] around the portion of the document you want to scan. Everything inside the box will be scanned, everything outside of the box will not be scanned. You can adjust your selection by clicking and dragging the edge of the selection.

9. Click the "Scan" button [FIGURE G] to complete the scan

10. A dialogue box will open asking you where you would like to save your scans and in what format. Navigate to find a place to save (I suggest in a folder you create in your documents folder). Save your document as a JPEG (aka JPG)
Sunday, August 26, 2007

Welcome to Computer Apps

Welcome to BA 113 - Computer Applications. Just a few things to know for starters. First, this blog will catalog our class. On this site you will be able to access all material covered in class (in brief), lessons, tutorials, suggestions, projects and homework assignments. Additionally, you will be able to download and print much of the same information through IQweb.

What we will cover today:
  1. Syllabus
  2. File Storage
  3. OSX
  4. Homework