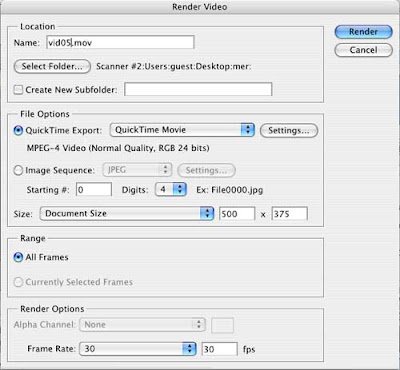
- Have your completed animation open in Photoshop
- Got to File > Export > Render Video
- The "Render Video" dialog box will appear

- Give your file a name (do not disturb the three letter file extension)
- Select the location of your choice to save it into
- Select Quicktime Export
- Click the "Settings" button to the right of "Quicktime export"
- "Movie Settings" dialogue box appears

- Click "Settings" at the top
- "Standard Movie Compression Settings" dialogue box appears (I know, that is a lot of boxes)

- Compression type = Mpeg 4
- Set the frame rate to "30"
- Set the key frame to "auto"
- Set the Compressor to "medium"
- Data rate to "auto"
- Click OK
- Back to "Movie Settings" dialogue box
- Size 500x300 (youtube = 320x240)
- Uncheck sound
- Uncheck prepare for internet streaming
- Back to "Render Video" dialog box
- Check all frames
- Render options set to 30
- Click ok
Last, go back to finder and click once on the file. Look to see that the file is an appropriate size (YouTube and Vimeo will tell you what size they can handle)
No comments:
Post a Comment