Showing posts with label assignment. Show all posts

Wednesday, November 28, 2007

Finishing out the semester

Next week is our last meeting. It will be a work day for the completion of your "How to" pamplet/zines. Be sure to arrive to class at least 50% finished so that you are not too rushed or unable to complete the project on time. At the end of class you will print, fold and turn your pamplet/zine in for grading.

Grading criteria:
  • Did you shoot and post your sequential images on your photobucket or flickr (you can "find" some images on the web, but not all)
  • Did you successfully use those images to create a series of illustrations using the pen tool
  • Did you use both images and text to describe your "how to" on every page (including back cover)
  • Does your project successfully illustrate your process
  • Work ethic and quality of work

Turning your text UP-SIDE-DOWN

You will need to flip your text to appear as though it is up-side-down for pages 1, 2, 3 and the inside cover. You will notice if you select the text and manually rotate it using the double sided arrow that the selection box rotates, but the text does not.
Follow these steps to rotate:
  • Select all of the text with the Selection tool (the dark arrow)
  • Use the "Effect" drop down in the Menu bar at the top
  • Go to Effect> Distort and Transform> Transform...
  • The "Transform Effect" dialogue box will appear
  • At the bottom is a section called "Rotate"
  • In "Angle" box type 180 (for a 180 degree rotate)


Sunday, November 18, 2007

DUE AFTER BREAK

FOR YOUR FIRST CLASS FOLLOWING THE BREAK:
You must come to class with a series of photographic images that you have taken of your 4-6 step process. These are the images that you will "trace" to create your illustrations for your "how to" pamphlet.
MINIMUM: 10 images charting the process uploaded to your FLICKR or PHOTOBUCKET

Final Assignment - HOW TO?

HOW TO
“How To” Single Fold Zine/Pamphlet
Due at the end of the final day of class


For your final assignment you will be creating a 4 to 6 page “how to” zine/pamphlet. The images and text will all be created by you and organized on a sheet of 11x17 paper that when folded, creates a 4 page booklet. Your final booklet can be in black and white or color. It should demonstrate your process using images, as well as accompanying text.

“How to”
What do you know how to do and how can you illustrate it in 4-6 simple steps? You will do this by first photographing your 4-6 step process. Next, you will ‘place’ your photos and trace them with the pen tool, creating a graphic interpretation of the process. Think simply and visually when choosing your “how to” – like IKEA instruction manuals. Think about a process that has distinct steps. Assume your audience has NO knowledge of how to perform this…
Some examples: How to brush your teeth. How eat spaghetti. How to read a newspaper. How to cross the street. How to survive a bear attack!
Your “how to” can be anything at all that you choose!

The Specifics:
Printed Tabloid paper (11x17)
Folded, not cut
Text and image

Schedule for WED section:
Wed 14 – Intro to Assignment – Rulers, layout, Photographing
T-Day Break
Wed 28 – Work Day
Wed 5 – Final Class – Work Day, Print and turn in.

Schedule for MON section:
Mon 19 – Intro to Assignment – Rulers, Live trace, Photographing
T-Day Break
Mon 26 – Work Day
Mon 3 – Final Class – Work Day, Print and turn in.

Managing your classwork

Below is a comprehensive list of assignments for the WHOLE semester. Any work completed, or posted, between now and the end of the semester will be counted for partial credit and only help your final grade.

Blog Posts that count for credit:
Post 1 - Post 5 websites that you use on a regular basis. Make them links if you can.

Post 2 - Post one of images you scanned after scaling, optimizing and saving for web.

Post 3 - Answer the following questions: What is compression and why do we use it? What is the difference between lossy and lossless compression?

Post 4 - Take the scan (the one you posted last week) and apply a filter or a glazing layer on it to make it into a "background" image.

Post 5 - [you should have a classmates "one a day" from last week] Use the your selection tools to cut out an "object" and apply it to a new layer. Use the brush tool (opacity, textures and scale) to "recreate" the object on another layer (this was the day we used the fish)

Post 6 - [you should have a classmates "one a day" from last week] Use the complex selection processes we learned (extract, quick selection) to isolate, select and add an "object" from one of your online images (the images you are gathering for the "Documentation and Annotation" project) to the "One a Day" image you downloaded in class.

Post 7 - Post your Documentation and Annotation video here.

Post 8 - Post a link to your Documentation and Annotation Flickr or Photobucket site

Post 9 - Post an image of your flickr map that is a link to the flickr map OR embed your google map (again part of the documentation and annotation project)
Additional Assignments:
- Set up a file storage system of folders to use for the class
http://ca-moore.blogspot.com/2007/08/homework-week-1.html

- Scan two images
http://ca-moore.blogspot.com/2007/08/homework-week-1.html

- Start a "text edit" document to keep track of all of your user names and passwords
http://ca-moore.blogspot.com/2007/08/homework-week-1.html

- Customize your blog colors (background, text, links, etc) by going to Template>Fonts and Colors tab.
http://ca-moore.blogspot.com/2007/09/homework-week-4.html

- Have a minimum of 20 images on your flickr or other online photography management tool. They should all be tagged, named and commented. If your site does not have "comments" you must add, by using the URL image option, 5 images to your blog and comment on them there.
http://ca-moore.blogspot.com/2007/10/homwork-week-7.html

Wednesday, October 17, 2007

Assignment - Make VIDEO!!

Create a 30 second video using still images you gathered for your "Documentation and Spatial Annotation" project (from here forward called your "DSA".) You will do this by using the Animation palette in Photoshop. This video should attempt to visually highlight the specific phenomena that you have been attempting to capture for the "DSA" project. Please do not make arbitrary edits to accomplish this assignment. Instead, think about how you can communicate to the audience your line of investigation through photography and animation.
You must fulfill the following requirements:
  • Use a minimum of 5 of the still images that you took for the "DSA" project. You may use more than five, but use a curatorial eye and only use the images that you think best convey your idea.
  • You must add text in at least one place
  • Consider rhythm and tempo as a way to direct the viewers attention (what is the focus of your investigation)
  • You must save your raw animation as a .psd
  • You must export your animation to a .mov file
  • You must post your video on an online video management site like Vimeo or YouTube
  • Last, you must embed your video into a post on your blog

I have created step-by-step tutorials for each of the new skills above. Please use them to guide you through this process.
How animate your still images
Exporting to a .mov file
Embedding Video into a blog post (coming soon)
ONLINE VIDEO TUTORIALS POSTED HERE

Wednesday, October 10, 2007

BRING HEADPHONES TO CLASS

From here out is is a good idea to bring headphones and your camera to class!!! Don't forget your USB cord to your camera!!

Friday, September 21, 2007

Documentation and Spatial Annotation

This project will ask you to use slowness, observation, documentation, taxonomy and pattern to investigate your environment. It will manifest in the use of photography as a form of documentation-- but also include the distribution of those images online and the system you set up to understand the images themselves. Let's begin with the idea of the project. Read on...

The following quote is by John Stilgoe, a well know theorist on the subject of landscape. In this quote he speaks of his students interests. This quote speaks to slowness and observation:
One has noticed the escape hatches in the floors of inter-city buses and inquired about their relation to escape hatches in the roofs of new school buses. Another has reported a clutch of Virginia-Kentucky barns in an Idaho valley and wonders if the structures suggest a migration pattern. A third has found New York City limestone facades eroding and is trying to see if limestone erodes faster on the shady sides of the street. A fourth has noticed that playground equipment has changed rapidly in the past decade and wonders if children miss galvanized steel jungle gyms. Another has been trying to learn why some restaurants attract men and women of certain professions and repel others, and another has found a pattern in coffee shop location. Yet another reports that he can separate eastbound and westbound passengers at O’Hare Airport by the color of their raincoats.
What is a taxonomy? (READ LINKED ARTICLE)
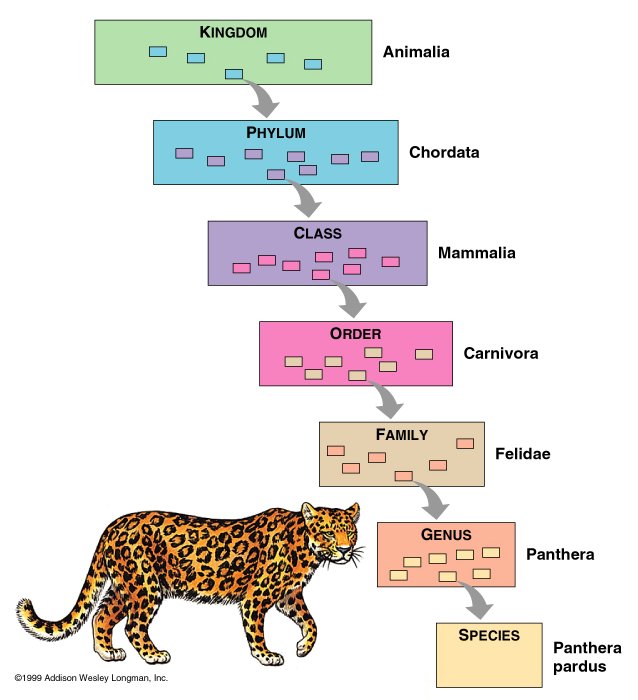
One of the most common strategies for organizing content is to place it in a taxonomy. A taxonomy is a hierarchical tree structure such as those used in scientific classification schemes. For example, the taxonomy for organizing all living things has 7 taxons, or levels: kingdom, phylum, class, order, family, genus, and species. Since a taxonomy is hierarchical, each living thing (each species) is organized under a particular genus, which in turn is organized under a particular family, which in turn is organized under a particular order, and so on up the tree.
From: Folksonomies: A User-Driven Approach to Organizing Content
Here is an example of the most common taxonomy that we are all familiar with.
OK, so I get taxonomy, but what is Folksonomy and how does it relate to the project? In many of the online management systems you will be experimenting with, there is a system of tags. You will use these tags as a way to create your own way of organizing your documentation.
So what exactly are tags? A simple definition would be to say that tags are keywords, category names, or metadata. In essence, a tag is simply a freely chosen set of textual keywords. However, because tags are not created by information specialists, they do not at present follow any ubiquitous formal guidelines. This means that items can be categorised with any word that defines a relationship between the online resource and a concept in the user's mind. Any number of words might be chosen, some of which are obvious representations, others making less sense outside the tag author's context.
From: Folksonomies: Tidying up tags
Still have questions? Read here about Social Bookmarking, Tagging, Music/Photo/Video Sharing

Where do I begin? Here is what your process might look like:

  1. Go out into the world and take your time. Use slowness in your step. Look at your environment in a way that questions the origin and placement of all objects both natural and artificial—whether placed via “official” channels, or by other. What is "natural" and what is "artificial"?
  2. Hone in on a phenomenon, a place of focus. Think, write and post about how you began to realize or recognize that phenomenon.
  3. Catalog and document that phenomenon wildly using your digital camera. Map the locations of the phenomenon as part of your documentation process.
  4. Can you distinguish a pattern, or logic? Can you place that logic into a system—a taxonomy? Create a system, or form to insert this data into using a variety of online tools and management systems.
  5. Make a plan to communicate what you have discovered in the world. We’ll go through the steps together to realize the project visually.
Some online management and sharing applications you may use (there may be others):
http://maps.google.com/
http://www.flickr.com
http://del.icio.us
http://www.youtube.com/
http://vimeo.com/
http://www.myspace.com/
http://www.facebook.com/
http://digg.com/
http://ma.gnolia.com
http://www.stumbleupon.com/
http://photobucket.com/
http://www.zoho.com/

Some programs you might choose to use for this project:
Photoshop
iPhoto
Quicktime
iMovie

Skills to learn:
How to be observant
How to manage photographs
How to create video from still images via Photoshop
How to use different online management and sharing applications
How to embed video or audio on your blogger site
How to embed images, video and audio in a google map
How to troubleshoot