Wednesday, September 19, 2007

One A Day - Manipulation 02

Manipulate your original scan using filters, layers and opacity to create an image that will serve as a background for the manipulations to come. Think about dulling the contrast by adding a "glazing" layer.
Here is an example:

Homework - Week 4

1.) Upload first revisions to your blog after re-sampling and optimizing.
2.) Upload revised full quality PSD to drop/send. (need the user name and password? Look it up on the "One a Day" assignment handout in your iqweb)
3.) Download your classmates revision from drop/send. After downloading and checking it to make sure the downloadwas successful - delete it from drop/send by checking the box to the left of the file and clicking "Delete".
4.) Customize your blog colors (background, text, links, etc) by going to Template>Fonts and Colors tab. GO HERE FOR A QUICK TUTORIAL

BRING YOUR DIGITAL CAMERA TO CLASS AND USB CORD!

Tuesday, September 18, 2007

Resampling & Save for Web

Re-sampling, or re-formatting, is the process of modifying the pixel count of an image. The reason we do this, is again, to make our file size as small as possible. You have started your "One a Day" project with a scan at 300 dpi, but a web image only needs to be 72 dpi. So we will re-sample the image as a means to be efficient and save room.
1.) Open your image in Photoshop.
2.) Go to Image>Image Size...
3.) First drop your resolution from 300 pixels/inch to 72 pixels/inch
4.) Next modify the "Pixel Dimension" width to meet your needs (between 300 - 500 pixels will be sufficient to fill your blog column.)
5.) Click OK
6.) Move along to the "Save for Web" tutorial below.


To prepare your image to post on Blogger is to optimize it using the "Save for Web" option. Optimizing is a way to lower your file size while not degrading your image quality. This will save more space on your blogger account.

1.) Open you image in photoshop.
2.) Go to "File" - "Save for Web"
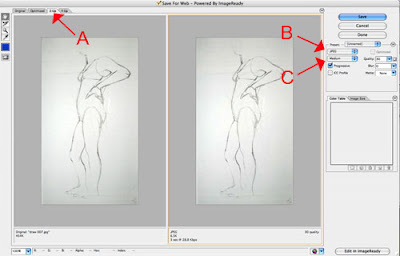
3.) The "Save for Web" dialog box will open. Click on the tab "2-up" in the upper left hand corner [FIGURE A]. This will give you the original image on the left and the optimized version(s) on the right.
4.) On the right hand size you will see some options. Use the drop-down menu on the left, to make sure you are saving your image as a "JPEG" [FIGURE B].
5.) Use the next drop-down menu to choose the level of image quality [FIGURE C]. Try each option and watch how your image changes in the right hand window. Choose the image quality that is the lowest file size, but still acceptable to your for image quality. Remember, the goal here is to obtain the lowest file size possible to save space. (Aim for around 12k if you can)
6.) Looks good? SAVE!! and ReName-But remember not to use spaces in you file name. I also like to use the word "web" in it, so i know it is my web image. Save it in your images folder.
7.) Post it on your weblog! (Remember when posting on the blog, choose large image (since you have already formatted it, making it smaller is unnecessary.)

Wednesday, September 12, 2007

Homework - Week 3

Understanding file size
Lossy vs. Lossless
Digital Image Files Explained

For Homework
Answer the two following questions on your blog:
What is compression and why do we use it?
What is the difference between lossy and lossless compression?

Upload your optimized original "one a day" to your blog in a single post.

Tuesday, September 4, 2007

Scanning Tutorial

1. Open the Epson Scanner Application
- in the library, just click on the scanner icon in the dock (TIP: if you are scanning in the Library and need to use drop/send to transfer your files, know that only the left hand computer, closest to the corner, has internet access)
- in the computer lab, open a finder window and go to "Applications", then EpsonScanner.app

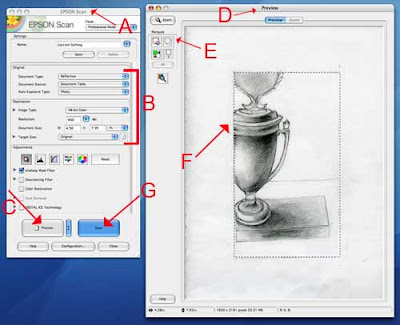
2. The Epson Scan window will open [FIGURE A] (the preview window may open to, just leave it).

3. Check your Settings [FIGURE B]: use the drop down menus to make your selections as follows:
Document type: Reflective
Document Source: Document table
Auto Exposure Type: Photo
Image Type: 48-bit or 24-bit color
Resolution: Select your resolution anywhere between 150 - 400 DPI (dots per inch) The more dots per inch, the larger the file size. If you need to use email to transfer the file, you will want to choose a smaller file size. If you have an iPod or flash drive, or plan to burn a disk - shoot for 300 dpi

4. The remaining adjustments can be left untouched.

5. Place your document on the scanner bed and close the lid.

6. Click the "Preview" button [FIGURE C]

7. The "Preview" window will open [FIGURE D] and the scanner will take a quick image of the document and display it here. If you need to reposition the document, do so now and hit "Preview" again.

8. Use the marquee tool [FIGURE E] to draw a selection [FIGURE F] around the portion of the document you want to scan. Everything inside the box will be scanned, everything outside of the box will not be scanned. You can adjust your selection by clicking and dragging the edge of the selection.

9. Click the "Scan" button [FIGURE G] to complete the scan

10. A dialogue box will open asking you where you would like to save your scans and in what format. Navigate to find a place to save (I suggest in a folder you create in your documents folder). Save your document as a JPEG (aka JPG)
Week 2 Homework

  1. Come prepared with your 2 images scanned as per the tutorial. They should also be cropped and rotated. They should be saved to your drop/send, external or disk.
  2. Create your Blog!
  3. Make your first post on your blog. In the post, make a list of websites that you use on a regular basis (minimum of 5.) Impress me my making the URL's function as links (not manditory, but if you can do it - go for it!)
  4. Email me the URL for your blog - mwarner at moore

Monday, September 3, 2007

Using your iPod for file storage

If you plan on using your iPod as an external disk, you will need to format it. You can download this PDF for instructions. Look under "Extra Features and Accessories," then click on "Using iPod as an External Disk." This will take you to page 45 of the manual. Additionally, on page 46, you may want to follow the formatting instructions to prevent iTunes from automatically opening. This way, when you connect your iPod for the purpose of file storage, you will not have to wait for iTunes to boot up. You will just open your iPod in a Finder window.

The link above may not be the exact instuctions for your particular iPod, depending on what model you own. You can go to the Apple website to get the manual for your particular model. CLICK HERE FOR A LIST OF DIFFERENT MODELS AND MANUALS.

You should also be sure to prevent the lab computers from syncing with yout iPod when you initially attach it. Cancel out it this starts automatically.