Wednesday, November 28, 2007

Finishing out the semester

Next week is our last meeting. It will be a work day for the completion of your "How to" pamplet/zines. Be sure to arrive to class at least 50% finished so that you are not too rushed or unable to complete the project on time. At the end of class you will print, fold and turn your pamplet/zine in for grading.

Grading criteria:
  • Did you shoot and post your sequential images on your photobucket or flickr (you can "find" some images on the web, but not all)
  • Did you successfully use those images to create a series of illustrations using the pen tool
  • Did you use both images and text to describe your "how to" on every page (including back cover)
  • Does your project successfully illustrate your process
  • Work ethic and quality of work

Turning your text UP-SIDE-DOWN

You will need to flip your text to appear as though it is up-side-down for pages 1, 2, 3 and the inside cover. You will notice if you select the text and manually rotate it using the double sided arrow that the selection box rotates, but the text does not.
Follow these steps to rotate:
  • Select all of the text with the Selection tool (the dark arrow)
  • Use the "Effect" drop down in the Menu bar at the top
  • Go to Effect> Distort and Transform> Transform...
  • The "Transform Effect" dialogue box will appear
  • At the bottom is a section called "Rotate"
  • In "Angle" box type 180 (for a 180 degree rotate)


Sunday, November 18, 2007

DUE AFTER BREAK

FOR YOUR FIRST CLASS FOLLOWING THE BREAK:
You must come to class with a series of photographic images that you have taken of your 4-6 step process. These are the images that you will "trace" to create your illustrations for your "how to" pamphlet.
MINIMUM: 10 images charting the process uploaded to your FLICKR or PHOTOBUCKET

Final Assignment - HOW TO?

HOW TO
“How To” Single Fold Zine/Pamphlet
Due at the end of the final day of class


For your final assignment you will be creating a 4 to 6 page “how to” zine/pamphlet. The images and text will all be created by you and organized on a sheet of 11x17 paper that when folded, creates a 4 page booklet. Your final booklet can be in black and white or color. It should demonstrate your process using images, as well as accompanying text.

“How to”
What do you know how to do and how can you illustrate it in 4-6 simple steps? You will do this by first photographing your 4-6 step process. Next, you will ‘place’ your photos and trace them with the pen tool, creating a graphic interpretation of the process. Think simply and visually when choosing your “how to” – like IKEA instruction manuals. Think about a process that has distinct steps. Assume your audience has NO knowledge of how to perform this…
Some examples: How to brush your teeth. How eat spaghetti. How to read a newspaper. How to cross the street. How to survive a bear attack!
Your “how to” can be anything at all that you choose!

The Specifics:
Printed Tabloid paper (11x17)
Folded, not cut
Text and image

Schedule for WED section:
Wed 14 – Intro to Assignment – Rulers, layout, Photographing
T-Day Break
Wed 28 – Work Day
Wed 5 – Final Class – Work Day, Print and turn in.

Schedule for MON section:
Mon 19 – Intro to Assignment – Rulers, Live trace, Photographing
T-Day Break
Mon 26 – Work Day
Mon 3 – Final Class – Work Day, Print and turn in.

Managing your classwork

Below is a comprehensive list of assignments for the WHOLE semester. Any work completed, or posted, between now and the end of the semester will be counted for partial credit and only help your final grade.

Blog Posts that count for credit:
Post 1 - Post 5 websites that you use on a regular basis. Make them links if you can.

Post 2 - Post one of images you scanned after scaling, optimizing and saving for web.

Post 3 - Answer the following questions: What is compression and why do we use it? What is the difference between lossy and lossless compression?

Post 4 - Take the scan (the one you posted last week) and apply a filter or a glazing layer on it to make it into a "background" image.

Post 5 - [you should have a classmates "one a day" from last week] Use the your selection tools to cut out an "object" and apply it to a new layer. Use the brush tool (opacity, textures and scale) to "recreate" the object on another layer (this was the day we used the fish)

Post 6 - [you should have a classmates "one a day" from last week] Use the complex selection processes we learned (extract, quick selection) to isolate, select and add an "object" from one of your online images (the images you are gathering for the "Documentation and Annotation" project) to the "One a Day" image you downloaded in class.

Post 7 - Post your Documentation and Annotation video here.

Post 8 - Post a link to your Documentation and Annotation Flickr or Photobucket site

Post 9 - Post an image of your flickr map that is a link to the flickr map OR embed your google map (again part of the documentation and annotation project)
Additional Assignments:
- Set up a file storage system of folders to use for the class
http://ca-moore.blogspot.com/2007/08/homework-week-1.html

- Scan two images
http://ca-moore.blogspot.com/2007/08/homework-week-1.html

- Start a "text edit" document to keep track of all of your user names and passwords
http://ca-moore.blogspot.com/2007/08/homework-week-1.html

- Customize your blog colors (background, text, links, etc) by going to Template>Fonts and Colors tab.
http://ca-moore.blogspot.com/2007/09/homework-week-4.html

- Have a minimum of 20 images on your flickr or other online photography management tool. They should all be tagged, named and commented. If your site does not have "comments" you must add, by using the URL image option, 5 images to your blog and comment on them there.
http://ca-moore.blogspot.com/2007/10/homwork-week-7.html

Monday, November 12, 2007

BRING YOUR CAMERA TO CLASS

If you have a digital camera, please bring it to class along with your USB cord to download images. This applies to Wednesday, Nov. 14th and Monday, Nov. 19th.

Wednesday, October 31, 2007

Your Finished project

Your finished project should exist on your blog in three distinct blog post"

Post 1
Your Video embedded via vimeo or youtube (not posted directly from blogger.)

Post 2
The URL to your Flickr or photobucket site along with writing about the project. Many of you accomplished the writing in the "commenting" phase. Feel free to cut and paste here but make sure it is a cohesive statement about what you chose to investigate.

Post 3
Your Map - If you used google maps, you should EMBED your map in this post. If you used the flickr map option you should upload a screen shot (apple-shift-4 to capture) of the map, and make that image a link to your map.

GOOGLE MAPS - code to add an image

< carrot img src="http://thelocationofyourimagehere.jpg/" width="200" carrot/>

Adding imaged to google maps:
  • Add the code above to the "edit html" tab of the google maps dialogue box.
  • Navigate in another tab to your online photo that you want to show
  • CONTROL click on the image and click on "Save Image Location"
  • Go back to the google map and paste that location between the quotation marks of the code.
  • In the code-- remove the word "carrot" from the beginning and the end
  • click ok
  • The code is a particular language. The accidental removal of punctuation will make it fail. Be careful when cutting and pasting.
  • MAKE SURE YOU ARE WORKING IN FIREFOX - not safari!

Thursday, October 18, 2007

vimeo test

I added this to test the Vimeo "embed" function. But I really like it, so I'll just leave it. I think it give you a good idea of the difference between the kinds of videos you find on Vimeo vs. YouTube.


5x5 from Sam King on Vimeo.

Embedding video to your blog

You should have already opened a Vimeo or Youtube account and uploaded your video.
  1. Now, start a new post on your blogger.
  2. Toggle from the "Compose" tab to the "Edit HTML" tab in the upper right hand corner of the blog post window (see image)
  3. Open a new window or tab with your Vimeo or YouTube video on it.
  4. If using YouTube, there will be a small dialogue box to the left of the video that says "Embed." Highlight the code in the embed window {apple C} to copy it.
  5. Toggle to your blogger post. Click inside the body of the "Edit HTML" window. Then {apple V} to paste the code.
  6. Publish the post.
  7. If using Vimeo. Open your video on a page. Hover your cursor over the video. Three buttons will pop up in the upper right corner of the video. One of them says "Embed." Click on it.
  8. A pop-up window will open. {apple C} to copy the highlighted code.
  9. Toggle to your blogger post. Click inside the body of the "Edit HTML" window. Then {apple V} to paste the code.
  10. Publish the post.
  11. Test to make sure it worked.

Wednesday, October 17, 2007

Assignment - Make VIDEO!!

Create a 30 second video using still images you gathered for your "Documentation and Spatial Annotation" project (from here forward called your "DSA".) You will do this by using the Animation palette in Photoshop. This video should attempt to visually highlight the specific phenomena that you have been attempting to capture for the "DSA" project. Please do not make arbitrary edits to accomplish this assignment. Instead, think about how you can communicate to the audience your line of investigation through photography and animation.
You must fulfill the following requirements:
  • Use a minimum of 5 of the still images that you took for the "DSA" project. You may use more than five, but use a curatorial eye and only use the images that you think best convey your idea.
  • You must add text in at least one place
  • Consider rhythm and tempo as a way to direct the viewers attention (what is the focus of your investigation)
  • You must save your raw animation as a .psd
  • You must export your animation to a .mov file
  • You must post your video on an online video management site like Vimeo or YouTube
  • Last, you must embed your video into a post on your blog

I have created step-by-step tutorials for each of the new skills above. Please use them to guide you through this process.
How animate your still images
Exporting to a .mov file
Embedding Video into a blog post (coming soon)
ONLINE VIDEO TUTORIALS POSTED HERE

How to Animate your Still Images

  • Open Photoshop - Do not open your images yet
  • Set your workspace to the default: Window > Workspace > Default Workspace
  • Open the Animation Palette: Window > Animation
  • You should have a series of images prepared. Your images should be sized the same and be the same orientation (horizontal or vertical). They should also all live in a folder together.
  • Now load your images into photoshop: File > Scripts > Load Files into Stack...
  • A dialogue box will open: highlight your files. To highlight them all at once: click on the first, hold down shift, click on the last. Click ok.
  • Photoshop will automatically load the images into a single file as a series of layers. All layers will be "on," which means you will see the "eyes" turned on in the layers palette.
  • Once the files are loaded as layer, go to your animation palette and use the flyout menu. The icon for the flyout menu is very small. It looks like 3 little horizontal lines, like treads, in the upper right corner of the animation palette. When you click on it, the flyout will pop up... er, fly out.
  • Click on "Make Frames from Layers."
  • Be sure at this point to have the animation palette set to "frame" view. The animation palette has 2 views: Frames and Timeline. We want to work in frame view. To toggle between them, click the icon in the lower right corner of the animation palette. The frame view should look like a series of blocks lined in a horizontal row.
  • You will see that each layer loads as a frame in the animation palette.
  • As a default, frame "1" will be loaded at 10 seconds, and all of the other frames will load at 0 seconds. At the bottom of each frame you can adjust the amount of time that each frame is shown by clicking on the small drop-down and choosing a duration.
  • You will notice as you click on different frames that the layers palette has adjusted which layer is "on" (which eyes are on or off.) Since the layers palette is hierarchical from top to bottom, whatever is the top layer that is turned "on" will be the designated image for the frame.

Suggestions:
Until you get a handle on how the frames effect one another, work on editing your images and adding and subtracting layers first. Arrange and select the duration for your frames as a last step.

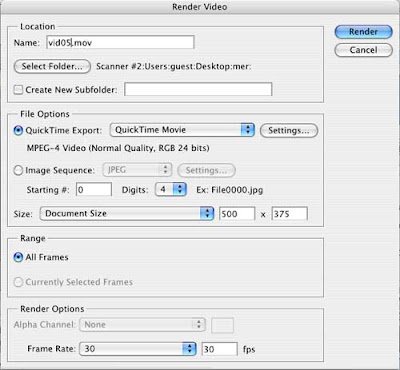
Exporting to a .mov file

This process will occur in a series of dialogue boxes. Just follow along.

  • Have your completed animation open in Photoshop
  • Got to File > Export > Render Video
  • The "Render Video" dialog box will appear

  • Give your file a name (do not disturb the three letter file extension)
  • Select the location of your choice to save it into
  • Select Quicktime Export
  • Click the "Settings" button to the right of "Quicktime export"
  • "Movie Settings" dialogue box appears
  • Click "Settings" at the top
  • "Standard Movie Compression Settings" dialogue box appears (I know, that is a lot of boxes)
  • Compression type = Mpeg 4
  • Set the frame rate to "30"
  • Set the key frame to "auto"
  • Set the Compressor to "medium"
  • Data rate to "auto"
  • Click OK
  • Back to "Movie Settings" dialogue box
  • Size 500x300 (youtube = 320x240)
  • Uncheck sound
  • Uncheck prepare for internet streaming
  • Back to "Render Video" dialog box
  • Check all frames
  • Render options set to 30
  • Click ok
After the export is completed, go to a Finder window and open the .mov file that you just created. Double click it to open it in quicktime. Make sure it plays properly.
Last, go back to finder and click once on the file. Look to see that the file is an appropriate size (YouTube and Vimeo will tell you what size they can handle)

Video Tutorials

First go HERE and watch 3 video tutorials. In the menu go to "Photoshop extended" in the left menu and "Animation" in the right. Watch these three:
Animating layer properties
Working with Image sequences
Using the animation palette

Also watch THIS
Last. Learn how to optomize video for the web HERE

Wednesday, October 10, 2007

BRING HEADPHONES TO CLASS

From here out is is a good idea to bring headphones and your camera to class!!! Don't forget your USB cord to your camera!!

Homework - Week 7

1. Upload the images you took this week to the "Documentation and Annotation" project to your online Photo collection. You should have a minimum of 20 that fit into your specific project. Your images should be named, tagged and commented (if your site does not have "comments" you must add, by using the URL image option, 5 images to your blog and comment on them.)

2. Use the selection processes we learned today to isolate, select and add an "object" from one of your online images (the images you are gathering for the "Documentation and Annotation" project) to the "One a Day" image you downloaded in class. Upload the full quality PSD to drop/send. Upload the optimized JPG to your blog.

HOW TO SAVE FOR ONE A DAY
  1. Complete your edit
  2. File > Save as > 04_originalname_yourname.psd
  3. Save it in yout "mine" folder
  4. Upload it to Drop Send
  5. Now make your small image
  6. Image > image size > 72 dpi
  7. Save for web > 04originalname_yourname.jpg
  8. Save it in your "web" folder
  9. Upload it to your blog

Thursday, October 4, 2007

Homework - Week 6

Now that you have narrowed your topic, continue to add to your catalog of images. Post you images to an online photography management application and forward me your URL. If you are using an application that allows for comments, take the time to write about your images and their location. If there is no place to comment - create a post on your blog with an example image, the link to your photographs and some comments.

Examples of images in series

The Stray Shopping Cart Project
Isolated Building Study
Urban Mark-up Language

US Benchmarks Cataloged
Nina Katchadourian
Charlie Roderick's Platform Series
Charlie Roderick's Territory Series (erased graffiti)
Matt Siber

Wednesday, September 26, 2007

Homework - Week 5

One a day
  • Find an image of an object through google image search
  • Download, paste, transform (apple T), select using magic wand and polygonal lasso (apple D to deselect)
  • Use the brush tool (opacity, textures and scale) to "recreate" the object on another layer
  • Delete the original object layer
  • Resample, Optimize, Save for web
  • Upload to your blog

Documentation and Spatial Annotation
  • Go out into the world and look around - take some pictures
  • Browse through the different online management tools that I have listed and think about which ones you might use (go ahead and sign up!)
  • Browse the artist websites that I provided for you
  • Come to class with at least 15 images (on your drive, camera, laptop, or flickr)
  • Think about and be prepared to speak about what you saw, what is interesting to you and how that might fit into a system

Friday, September 21, 2007

Documentation and Spatial Annotation

This project will ask you to use slowness, observation, documentation, taxonomy and pattern to investigate your environment. It will manifest in the use of photography as a form of documentation-- but also include the distribution of those images online and the system you set up to understand the images themselves. Let's begin with the idea of the project. Read on...

The following quote is by John Stilgoe, a well know theorist on the subject of landscape. In this quote he speaks of his students interests. This quote speaks to slowness and observation:
One has noticed the escape hatches in the floors of inter-city buses and inquired about their relation to escape hatches in the roofs of new school buses. Another has reported a clutch of Virginia-Kentucky barns in an Idaho valley and wonders if the structures suggest a migration pattern. A third has found New York City limestone facades eroding and is trying to see if limestone erodes faster on the shady sides of the street. A fourth has noticed that playground equipment has changed rapidly in the past decade and wonders if children miss galvanized steel jungle gyms. Another has been trying to learn why some restaurants attract men and women of certain professions and repel others, and another has found a pattern in coffee shop location. Yet another reports that he can separate eastbound and westbound passengers at O’Hare Airport by the color of their raincoats.
What is a taxonomy? (READ LINKED ARTICLE)
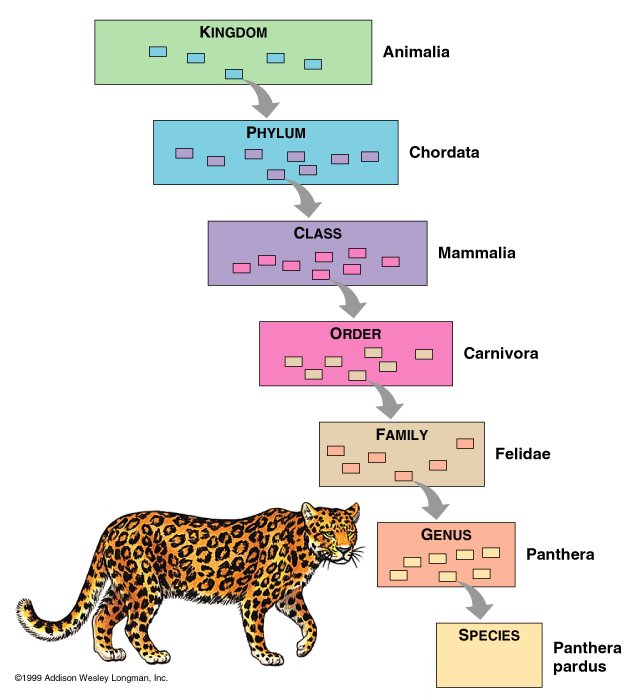
One of the most common strategies for organizing content is to place it in a taxonomy. A taxonomy is a hierarchical tree structure such as those used in scientific classification schemes. For example, the taxonomy for organizing all living things has 7 taxons, or levels: kingdom, phylum, class, order, family, genus, and species. Since a taxonomy is hierarchical, each living thing (each species) is organized under a particular genus, which in turn is organized under a particular family, which in turn is organized under a particular order, and so on up the tree.
From: Folksonomies: A User-Driven Approach to Organizing Content
Here is an example of the most common taxonomy that we are all familiar with.
OK, so I get taxonomy, but what is Folksonomy and how does it relate to the project? In many of the online management systems you will be experimenting with, there is a system of tags. You will use these tags as a way to create your own way of organizing your documentation.
So what exactly are tags? A simple definition would be to say that tags are keywords, category names, or metadata. In essence, a tag is simply a freely chosen set of textual keywords. However, because tags are not created by information specialists, they do not at present follow any ubiquitous formal guidelines. This means that items can be categorised with any word that defines a relationship between the online resource and a concept in the user's mind. Any number of words might be chosen, some of which are obvious representations, others making less sense outside the tag author's context.
From: Folksonomies: Tidying up tags
Still have questions? Read here about Social Bookmarking, Tagging, Music/Photo/Video Sharing

Where do I begin? Here is what your process might look like:

  1. Go out into the world and take your time. Use slowness in your step. Look at your environment in a way that questions the origin and placement of all objects both natural and artificial—whether placed via “official” channels, or by other. What is "natural" and what is "artificial"?
  2. Hone in on a phenomenon, a place of focus. Think, write and post about how you began to realize or recognize that phenomenon.
  3. Catalog and document that phenomenon wildly using your digital camera. Map the locations of the phenomenon as part of your documentation process.
  4. Can you distinguish a pattern, or logic? Can you place that logic into a system—a taxonomy? Create a system, or form to insert this data into using a variety of online tools and management systems.
  5. Make a plan to communicate what you have discovered in the world. We’ll go through the steps together to realize the project visually.
Some online management and sharing applications you may use (there may be others):
http://maps.google.com/
http://www.flickr.com
http://del.icio.us
http://www.youtube.com/
http://vimeo.com/
http://www.myspace.com/
http://www.facebook.com/
http://digg.com/
http://ma.gnolia.com
http://www.stumbleupon.com/
http://photobucket.com/
http://www.zoho.com/

Some programs you might choose to use for this project:
Photoshop
iPhoto
Quicktime
iMovie

Skills to learn:
How to be observant
How to manage photographs
How to create video from still images via Photoshop
How to use different online management and sharing applications
How to embed video or audio on your blogger site
How to embed images, video and audio in a google map
How to troubleshoot

Some Examples I created

Yours will be more focused, more detailed and more refined. But hopefully these serve to give you a rough idea of what is possible:
1.) This is a series of images (documentation) that are transformed into video using the Animation palette in Photoshop. Quicktime is then used to compress the video.

2.) This is a Google map embedded with images (documentation). Video and sound can also be incorporated here.

View Larger Map

Artists + Taxonomy

Artists using the notion of taxonomy in their work:
Graffiti Taxonomy
Brian Collier
Bernd + Hilla Becher (SEE IMAGES BELOW)
Wallid Raad - The Atlas Group
The Institute for Infinitely Small Things
The Spatial Annotations Project
The Wooster Collective
One Block Radius
"Map" by datenform.de
An Atlas of Radical Cartography


Wednesday, September 19, 2007

One A Day - Manipulation 02

Manipulate your original scan using filters, layers and opacity to create an image that will serve as a background for the manipulations to come. Think about dulling the contrast by adding a "glazing" layer.
Here is an example:

Homework - Week 4

1.) Upload first revisions to your blog after re-sampling and optimizing.
2.) Upload revised full quality PSD to drop/send. (need the user name and password? Look it up on the "One a Day" assignment handout in your iqweb)
3.) Download your classmates revision from drop/send. After downloading and checking it to make sure the downloadwas successful - delete it from drop/send by checking the box to the left of the file and clicking "Delete".
4.) Customize your blog colors (background, text, links, etc) by going to Template>Fonts and Colors tab. GO HERE FOR A QUICK TUTORIAL

BRING YOUR DIGITAL CAMERA TO CLASS AND USB CORD!

Tuesday, September 18, 2007

Resampling & Save for Web

Re-sampling, or re-formatting, is the process of modifying the pixel count of an image. The reason we do this, is again, to make our file size as small as possible. You have started your "One a Day" project with a scan at 300 dpi, but a web image only needs to be 72 dpi. So we will re-sample the image as a means to be efficient and save room.
1.) Open your image in Photoshop.
2.) Go to Image>Image Size...
3.) First drop your resolution from 300 pixels/inch to 72 pixels/inch
4.) Next modify the "Pixel Dimension" width to meet your needs (between 300 - 500 pixels will be sufficient to fill your blog column.)
5.) Click OK
6.) Move along to the "Save for Web" tutorial below.


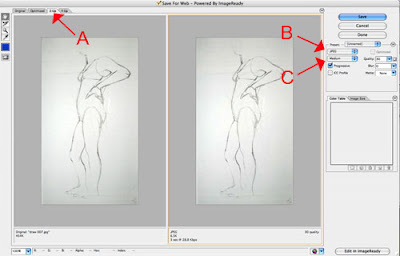
To prepare your image to post on Blogger is to optimize it using the "Save for Web" option. Optimizing is a way to lower your file size while not degrading your image quality. This will save more space on your blogger account.

1.) Open you image in photoshop.
2.) Go to "File" - "Save for Web"
3.) The "Save for Web" dialog box will open. Click on the tab "2-up" in the upper left hand corner [FIGURE A]. This will give you the original image on the left and the optimized version(s) on the right.
4.) On the right hand size you will see some options. Use the drop-down menu on the left, to make sure you are saving your image as a "JPEG" [FIGURE B].
5.) Use the next drop-down menu to choose the level of image quality [FIGURE C]. Try each option and watch how your image changes in the right hand window. Choose the image quality that is the lowest file size, but still acceptable to your for image quality. Remember, the goal here is to obtain the lowest file size possible to save space. (Aim for around 12k if you can)
6.) Looks good? SAVE!! and ReName-But remember not to use spaces in you file name. I also like to use the word "web" in it, so i know it is my web image. Save it in your images folder.
7.) Post it on your weblog! (Remember when posting on the blog, choose large image (since you have already formatted it, making it smaller is unnecessary.)

Wednesday, September 12, 2007

Homework - Week 3

Understanding file size
Lossy vs. Lossless
Digital Image Files Explained

For Homework
Answer the two following questions on your blog:
What is compression and why do we use it?
What is the difference between lossy and lossless compression?

Upload your optimized original "one a day" to your blog in a single post.

Tuesday, September 4, 2007

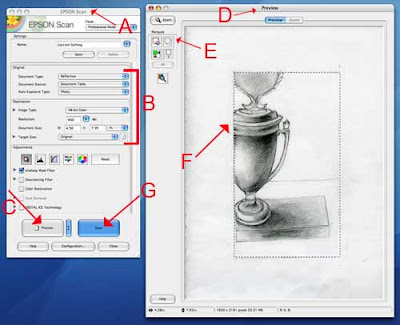
Scanning Tutorial

1. Open the Epson Scanner Application
- in the library, just click on the scanner icon in the dock (TIP: if you are scanning in the Library and need to use drop/send to transfer your files, know that only the left hand computer, closest to the corner, has internet access)
- in the computer lab, open a finder window and go to "Applications", then EpsonScanner.app

2. The Epson Scan window will open [FIGURE A] (the preview window may open to, just leave it).

3. Check your Settings [FIGURE B]: use the drop down menus to make your selections as follows:
Document type: Reflective
Document Source: Document table
Auto Exposure Type: Photo
Image Type: 48-bit or 24-bit color
Resolution: Select your resolution anywhere between 150 - 400 DPI (dots per inch) The more dots per inch, the larger the file size. If you need to use email to transfer the file, you will want to choose a smaller file size. If you have an iPod or flash drive, or plan to burn a disk - shoot for 300 dpi

4. The remaining adjustments can be left untouched.

5. Place your document on the scanner bed and close the lid.

6. Click the "Preview" button [FIGURE C]

7. The "Preview" window will open [FIGURE D] and the scanner will take a quick image of the document and display it here. If you need to reposition the document, do so now and hit "Preview" again.

8. Use the marquee tool [FIGURE E] to draw a selection [FIGURE F] around the portion of the document you want to scan. Everything inside the box will be scanned, everything outside of the box will not be scanned. You can adjust your selection by clicking and dragging the edge of the selection.

9. Click the "Scan" button [FIGURE G] to complete the scan

10. A dialogue box will open asking you where you would like to save your scans and in what format. Navigate to find a place to save (I suggest in a folder you create in your documents folder). Save your document as a JPEG (aka JPG)
Week 2 Homework

  1. Come prepared with your 2 images scanned as per the tutorial. They should also be cropped and rotated. They should be saved to your drop/send, external or disk.
  2. Create your Blog!
  3. Make your first post on your blog. In the post, make a list of websites that you use on a regular basis (minimum of 5.) Impress me my making the URL's function as links (not manditory, but if you can do it - go for it!)
  4. Email me the URL for your blog - mwarner at moore

Monday, September 3, 2007

Using your iPod for file storage

If you plan on using your iPod as an external disk, you will need to format it. You can download this PDF for instructions. Look under "Extra Features and Accessories," then click on "Using iPod as an External Disk." This will take you to page 45 of the manual. Additionally, on page 46, you may want to follow the formatting instructions to prevent iTunes from automatically opening. This way, when you connect your iPod for the purpose of file storage, you will not have to wait for iTunes to boot up. You will just open your iPod in a Finder window.

The link above may not be the exact instuctions for your particular iPod, depending on what model you own. You can go to the Apple website to get the manual for your particular model. CLICK HERE FOR A LIST OF DIFFERENT MODELS AND MANUALS.

You should also be sure to prevent the lab computers from syncing with yout iPod when you initially attach it. Cancel out it this starts automatically.

Sunday, August 26, 2007

Logging on in the LAB

To log on to the computer:
User name = Last Name SPACE First Name (i.e. warner meredith)
Password = your student number (look at your ID)

Welcome to Computer Apps

Welcome to BA 113 - Computer Applications. Just a few things to know for starters. First, this blog will catalog our class. On this site you will be able to access all material covered in class (in brief), lessons, tutorials, suggestions, projects and homework assignments. Additionally, you will be able to download and print much of the same information through IQweb.

What we will cover today:
  1. Syllabus
  2. File Storage
  3. OSX
  4. Homework

Friday, August 24, 2007

Suggestions on File Storage

DROP SEND
Throughout the semester you will be required to collect and store many, many image files. If you are working on a lab computer, you will need a reliable way to transfer those files from the lab computer to your own laptop (or another reliable, long-term storage location.) Below I write about the possibility of a thumb drive. But if you have a laptop, and are looking to save money, you can think about using Drop Send for these purposes. Drop Send is an online storage service. It offers a free account with limited services, and pay account for more expanded services.
_______

AN EXTERNAL DRIVE
A great temporary option is a Flash, Jump or Thumb drive. A thumb drive will be handy for all of your classes and a quick, small, portable way to move files around. Make sure if you go to buy one that it is more than 700mb.

-If you are anticipating accumulating photos, video and audio files over the course of your time at Moore, I would suggest that you also purchase an External Hard Drive ( a minimum of 250G) with a firewire connection. (If you choose a USB1 connection for your external harddrive it will be a lot slower to save files, however the USB2 is a bit faster than USB1 and sometimes less expensive than a firewire) This will run about $150 and will have a plug on it for a power source. It will not be as portable because of this. Lacie makes a large model that does not require an external power source, but it will be more expensive. Find one that comes ready to use, with out the addition of any software to your computer and make sure it is MAC compatible.


Some places to shop:
www.cnet.com
CNET has great product reviews and price comparisons. Go here first to shop around.
http://www.jr.com/
http://www.lacie.com
http://www.macmall.com

Keystrokes

This same set of keystrokes can be downloaded an printed from IQweb

F Keys

  • F9-shows all the windows that are open at once
  • F10-shows all the windows in the program that is in use
  • F11-pushes windows aside and makes the desktop available
  • F12 opens the dashboard
Command/Apple Keys

File Menu
  • apple q - quits the program
  • apple n- open new document that is in use
  • apple s- saves document that is in use
  • apple p- prints document that is in use
  • apple w- closes document

Edit menu
  • apple a- highlight all
  • apple c- copy's highlighted text or image
  • apple v-pastes highlighted text or image
  • apple x- cut and places in clipboard text or image
  • apple z- undo most recent command

Extras
  • apple 0 fits image to screen (but doesn’t change the size)
  • apple + or apple– increases and decreases image on screen
  • apple+shift+3 = screen capture
  • apple+shift+4 = highlights image and will save it as a jpeg file
  • apple delete = will send any highlighted file to the trashcan (in Finder)

Homework - Week 1

1. Decide upon a file storage system and have it set up and ready to go by the next class.

2. Setting up a Storage System:
- Create a system of folders to use for the class on your laptop, drop/send or thumb drive.
- Create a parent folder called “CA_Fall07” to contain all other folders and files.
- With in CA_Fall07, create a folder called “Images” to hold all raw data, photos, scans, etc.
- With in CA_Fall07, create a folder called “Projects,” to house all complete and in-process project.
- Create a Text Edit document to track all of your user names and passwords – name of your choice.

3. For our next class, bring with you to two images to scan. They can be from books, magazines, newspapers or hand drawn. Do not bring candid photographs or images printed from your computer. Content of the image is open. The image must be at least 3x5.