Your finished project should exist on your blog in three distinct blog post"
Post 1
Your Video embedded via vimeo or youtube (not posted directly from blogger.)
Post 2
The URL to your Flickr or photobucket site along with writing about the project. Many of you accomplished the writing in the "commenting" phase. Feel free to cut and paste here but make sure it is a cohesive statement about what you chose to investigate.
Post 3
Your Map - If you used google maps, you should EMBED your map in this post. If you used the flickr map option you should upload a screen shot (apple-shift-4 to capture) of the map, and make that image a link to your map.
Wednesday, October 31, 2007
GOOGLE MAPS - code to add an image
< carrot img src="http://thelocationofyourimagehere.jpg/" width="200" carrot/>
Adding imaged to google maps:
Adding imaged to google maps:
- Add the code above to the "edit html" tab of the google maps dialogue box.
- Navigate in another tab to your online photo that you want to show
- CONTROL click on the image and click on "Save Image Location"
- Go back to the google map and paste that location between the quotation marks of the code.
- In the code-- remove the word "carrot" from the beginning and the end
- click ok
- The code is a particular language. The accidental removal of punctuation will make it fail. Be careful when cutting and pasting.
- MAKE SURE YOU ARE WORKING IN FIREFOX - not safari!
Thursday, October 18, 2007
Embedding video to your blog
You should have already opened a Vimeo or Youtube account and uploaded your video.
- Now, start a new post on your blogger.
- Toggle from the "Compose" tab to the "Edit HTML" tab in the upper right hand corner of the blog post window (see image)

- Open a new window or tab with your Vimeo or YouTube video on it.
- If using YouTube, there will be a small dialogue box to the left of the video that says "Embed." Highlight the code in the embed window {apple C} to copy it.

- Toggle to your blogger post. Click inside the body of the "Edit HTML" window. Then {apple V} to paste the code.
- Publish the post.
- If using Vimeo. Open your video on a page. Hover your cursor over the video. Three buttons will pop up in the upper right corner of the video. One of them says "Embed." Click on it.

- A pop-up window will open. {apple C} to copy the highlighted code.

- Toggle to your blogger post. Click inside the body of the "Edit HTML" window. Then {apple V} to paste the code.
- Publish the post.
- Test to make sure it worked.
Wednesday, October 17, 2007
Assignment - Make VIDEO!!
Create a 30 second video using still images you gathered for your "Documentation and Spatial Annotation" project (from here forward called your "DSA".) You will do this by using the Animation palette in Photoshop. This video should attempt to visually highlight the specific phenomena that you have been attempting to capture for the "DSA" project. Please do not make arbitrary edits to accomplish this assignment. Instead, think about how you can communicate to the audience your line of investigation through photography and animation.
You must fulfill the following requirements:
I have created step-by-step tutorials for each of the new skills above. Please use them to guide you through this process.
How animate your still images
Exporting to a .mov file
Embedding Video into a blog post (coming soon)
ONLINE VIDEO TUTORIALS POSTED HERE
You must fulfill the following requirements:
- Use a minimum of 5 of the still images that you took for the "DSA" project. You may use more than five, but use a curatorial eye and only use the images that you think best convey your idea.
- You must add text in at least one place
- Consider rhythm and tempo as a way to direct the viewers attention (what is the focus of your investigation)
- You must save your raw animation as a .psd
- You must export your animation to a .mov file
- You must post your video on an online video management site like Vimeo or YouTube
- Last, you must embed your video into a post on your blog
I have created step-by-step tutorials for each of the new skills above. Please use them to guide you through this process.
How animate your still images
Exporting to a .mov file
Embedding Video into a blog post (coming soon)
ONLINE VIDEO TUTORIALS POSTED HERE
How to Animate your Still Images
- Open Photoshop - Do not open your images yet
- Set your workspace to the default: Window > Workspace > Default Workspace
- Open the Animation Palette: Window > Animation
- You should have a series of images prepared. Your images should be sized the same and be the same orientation (horizontal or vertical). They should also all live in a folder together.
- Now load your images into photoshop: File > Scripts > Load Files into Stack...
- A dialogue box will open: highlight your files. To highlight them all at once: click on the first, hold down shift, click on the last. Click ok.
- Photoshop will automatically load the images into a single file as a series of layers. All layers will be "on," which means you will see the "eyes" turned on in the layers palette.
- Once the files are loaded as layer, go to your animation palette and use the flyout menu. The icon for the flyout menu is very small. It looks like 3 little horizontal lines, like treads, in the upper right corner of the animation palette. When you click on it, the flyout will pop up... er, fly out.
- Click on "Make Frames from Layers."
- Be sure at this point to have the animation palette set to "frame" view. The animation palette has 2 views: Frames and Timeline. We want to work in frame view. To toggle between them, click the icon in the lower right corner of the animation palette. The frame view should look like a series of blocks lined in a horizontal row.
- You will see that each layer loads as a frame in the animation palette.
- As a default, frame "1" will be loaded at 10 seconds, and all of the other frames will load at 0 seconds. At the bottom of each frame you can adjust the amount of time that each frame is shown by clicking on the small drop-down and choosing a duration.
- You will notice as you click on different frames that the layers palette has adjusted which layer is "on" (which eyes are on or off.) Since the layers palette is hierarchical from top to bottom, whatever is the top layer that is turned "on" will be the designated image for the frame.
Suggestions:
Until you get a handle on how the frames effect one another, work on editing your images and adding and subtracting layers first. Arrange and select the duration for your frames as a last step.
Exporting to a .mov file
This process will occur in a series of dialogue boxes. Just follow along.

Last, go back to finder and click once on the file. Look to see that the file is an appropriate size (YouTube and Vimeo will tell you what size they can handle)
- Have your completed animation open in Photoshop
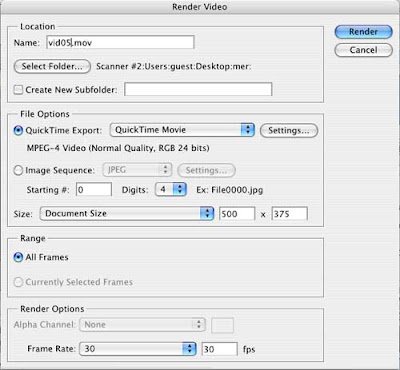
- Got to File > Export > Render Video
- The "Render Video" dialog box will appear

- Give your file a name (do not disturb the three letter file extension)
- Select the location of your choice to save it into
- Select Quicktime Export
- Click the "Settings" button to the right of "Quicktime export"
- "Movie Settings" dialogue box appears

- Click "Settings" at the top
- "Standard Movie Compression Settings" dialogue box appears (I know, that is a lot of boxes)

- Compression type = Mpeg 4
- Set the frame rate to "30"
- Set the key frame to "auto"
- Set the Compressor to "medium"
- Data rate to "auto"
- Click OK
- Back to "Movie Settings" dialogue box
- Size 500x300 (youtube = 320x240)
- Uncheck sound
- Uncheck prepare for internet streaming
- Back to "Render Video" dialog box
- Check all frames
- Render options set to 30
- Click ok
Last, go back to finder and click once on the file. Look to see that the file is an appropriate size (YouTube and Vimeo will tell you what size they can handle)
Video Tutorials
Wednesday, October 10, 2007
BRING HEADPHONES TO CLASS
From here out is is a good idea to bring headphones and your camera to class!!! Don't forget your USB cord to your camera!!
Homework - Week 7
1. Upload the images you took this week to the "Documentation and Annotation" project to your online Photo collection. You should have a minimum of 20 that fit into your specific project. Your images should be named, tagged and commented (if your site does not have "comments" you must add, by using the URL image option, 5 images to your blog and comment on them.)
2. Use the selection processes we learned today to isolate, select and add an "object" from one of your online images (the images you are gathering for the "Documentation and Annotation" project) to the "One a Day" image you downloaded in class. Upload the full quality PSD to drop/send. Upload the optimized JPG to your blog.
HOW TO SAVE FOR ONE A DAY
- Complete your edit
- File > Save as > 04_originalname_yourname.psd
- Save it in yout "mine" folder
- Upload it to Drop Send
- Now make your small image
- Image > image size > 72 dpi
- Save for web > 04originalname_yourname.jpg
- Save it in your "web" folder
- Upload it to your blog
Thursday, October 4, 2007
Homework - Week 6
Now that you have narrowed your topic, continue to add to your catalog of images. Post you images to an online photography management application and forward me your URL. If you are using an application that allows for comments, take the time to write about your images and their location. If there is no place to comment - create a post on your blog with an example image, the link to your photographs and some comments.
Subscribe to:
Posts (Atom)