- in the library, just click on the scanner icon in the dock (TIP: if you are scanning in the Library and need to use drop/send to transfer your files, know that only the left hand computer, closest to the corner, has internet access)
- in the computer lab, open a finder window and go to "Applications", then EpsonScanner.app
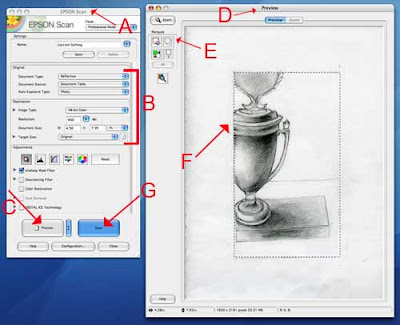
2. The Epson Scan window will open [FIGURE A] (the preview window may open to, just leave it).
3. Check your Settings [FIGURE B]: use the drop down menus to make your selections as follows:
Document type: Reflective
Document Source: Document table
Auto Exposure Type: Photo
Image Type: 48-bit or 24-bit color
Resolution: Select your resolution anywhere between 150 - 400 DPI (dots per inch) The more dots per inch, the larger the file size. If you need to use email to transfer the file, you will want to choose a smaller file size. If you have an iPod or flash drive, or plan to burn a disk - shoot for 300 dpi
4. The remaining adjustments can be left untouched.
5. Place your document on the scanner bed and close the lid.
6. Click the "Preview" button [FIGURE C]
7. The "Preview" window will open [FIGURE D] and the scanner will take a quick image of the document and display it here. If you need to reposition the document, do so now and hit "Preview" again.
8. Use the marquee tool [FIGURE E] to draw a selection [FIGURE F] around the portion of the document you want to scan. Everything inside the box will be scanned, everything outside of the box will not be scanned. You can adjust your selection by clicking and dragging the edge of the selection.
9. Click the "Scan" button [FIGURE G] to complete the scan
10. A dialogue box will open asking you where you would like to save your scans and in what format. Navigate to find a place to save (I suggest in a folder you create in your documents folder). Save your document as a JPEG (aka JPG)

No comments:
Post a Comment